΄Να θυμάσαι, ο διαλογισμός θα σου φέρει όλο και πιο πολλή ευφυΐα,
άπειρη ευφυΐα, ριζοσπαστική ευφυΐα. Ο διαλογισμός θα σε κάνει πιο
ζωντανό και ευαίσθητο΄ η ζωή σου θα γίνει πλουσιότερη.
΄΄Κοίτα
τους ασκητές: η ζωή τους έχει γίνει σχεδόν σαν να μην είναι ζωή. Οι
άνθρωποι αυτοί δεν είναι διαλογιστές. Μπορεί να είναι μαζοχιστές, να
βασανίζουν τον εαυτό τους και να απολαμβάνουν τα βασανιστήρια… Ο νους
είναι πολύ πονηρός, κάνει συνεχώς διάφορα πράγματα και τα εκλογικεύει.
΄΄Κατά κανόνα
είσαι βίαιος απέναντι στους άλλους, αλλά ο νους είναι πολύ πονηρός –
μπορεί να μάθει τη μη βία, μπορεί να διδάσκει τη μη βία και τότε γίνεται
βίαιος απέναντι στον εαυτό του. Και η βία που ασκείς στον εαυτό σου
είναι σεβαστή από τους ανθρώπους, διότι έχουν την ιδέα πως αν είσαι
ασκητής, είσαι θρησκευόμενος. Είναι τελείως ανόητο αυτό. Ο Θεός δεν
είναι ασκητής, αλλιώς δεν θα υπήρχαν λουλούδια, δεν θα υπήρχαν πράσινα
δέντρα, μόνον έρημοι. Ο Θεός δεν είναι ασκητής, αλλιώς δεν θα υπήρχε το
τραγούδι στη ζωή, ο χορός στη ζωή – μόνο ατέλειωτα νεκροταφεία. Ο Θεός
δεν είναι ασκητής: ο Θεός απολαμβάνει τη ζωή. Ο Θεός είναι περισσότερο
επικούρειος από όσο μπορείς να φανταστείς. Αν σκέφτεσαι το Θεό, να τον
σκέφτεσαι από την άποψη του Επίκουρου. Ο Θεός αποτελεί συνεχή αναζήτηση
για όλο και πιο πολλή ευτυχία, χαρά , έκσταση. Να το θυμάσαι αυτό.
΄΄Αλλά ο νους είναι πολύ πονηρός. Μπορεί κι εκλογικεύει την παράλυση ως
διαλογισμό΄ μπορεί κι εκλογικεύει τη νωθρότητα ως υπέρβαση: μπορεί κι
εκλογικεύει τη νέκρωση ως απάρνηση. Πρόσεχε. Να θυμάσαι πάντα ότι αν
κινείσαι στη σωστή κατεύθυνση, θα ανθίζεις συνεχώς.΄΄
Osho
΄Να θυμάσαι, ο διαλογισμός θα σου φέρει όλο και πιο πολλή ευφυΐα,
άπειρη ευφυΐα, ριζοσπαστική ευφυΐα. Ο διαλογισμός θα σε κάνει πιο
ζωντανό και ευαίσθητο΄ η ζωή σου θα γίνει πλουσιότερη.
΄΄Κοίτα
τους ασκητές: η ζωή τους έχει γίνει σχεδόν σαν να μην είναι ζωή. Οι
άνθρωποι αυτοί δεν είναι διαλογιστές. Μπορεί να είναι μαζοχιστές, να
βασανίζουν τον εαυτό τους και να απολαμβάνουν τα βασανιστήρια… Ο νους
είναι πολύ πονηρός, κάνει συνεχώς διάφορα πράγματα και τα εκλογικεύει.
΄΄Κατά κανόνα
είσαι βίαιος απέναντι στους άλλους, αλλά ο νους είναι πολύ πονηρός –
μπορεί να μάθει τη μη βία, μπορεί να διδάσκει τη μη βία και τότε γίνεται
βίαιος απέναντι στον εαυτό του. Και η βία που ασκείς στον εαυτό σου
είναι σεβαστή από τους ανθρώπους, διότι έχουν την ιδέα πως αν είσαι
ασκητής, είσαι θρησκευόμενος. Είναι τελείως ανόητο αυτό. Ο Θεός δεν
είναι ασκητής, αλλιώς δεν θα υπήρχαν λουλούδια, δεν θα υπήρχαν πράσινα
δέντρα, μόνον έρημοι. Ο Θεός δεν είναι ασκητής, αλλιώς δεν θα υπήρχε το
τραγούδι στη ζωή, ο χορός στη ζωή – μόνο ατέλειωτα νεκροταφεία. Ο Θεός
δεν είναι ασκητής: ο Θεός απολαμβάνει τη ζωή. Ο Θεός είναι περισσότερο
επικούρειος από όσο μπορείς να φανταστείς. Αν σκέφτεσαι το Θεό, να τον
σκέφτεσαι από την άποψη του Επίκουρου. Ο Θεός αποτελεί συνεχή αναζήτηση
για όλο και πιο πολλή ευτυχία, χαρά , έκσταση. Να το θυμάσαι αυτό.
΄΄Αλλά ο νους είναι πολύ πονηρός. Μπορεί κι εκλογικεύει την παράλυση ως
διαλογισμό΄ μπορεί κι εκλογικεύει τη νωθρότητα ως υπέρβαση: μπορεί κι
εκλογικεύει τη νέκρωση ως απάρνηση. Πρόσεχε. Να θυμάσαι πάντα ότι αν
κινείσαι στη σωστή κατεύθυνση, θα ανθίζεις συνεχώς.΄΄
Osho

 The number 108 is significant for so many reasons.
Some
believe there are 108 stages on the journey of the human soul, while
others associate the possibility of enlightenment with taking only 108
breaths a day, while in deep meditation.
No matter who you ask, the answer will most likely be different each time.
The truth is — the significance of 108 beads on your mala is open to interpretation. Which we love.
As
mala beads were traditionally created to be used as a tool in
meditation, we like to associate it with the ideals of meditation.
However
— we believe mala beads are also beautiful mediums to set intentions,
manifest, and generally feel good. You don't have to meditate on the
beads, although that's what they are made for in a practical sense.
Our
malas are handknotted between each seed and gemstone, allowing one to
chant their mantra — a sound or string of words — and keep track of were
they are.
Our mala necklaces all reflect the number 108. Almost
all of our malas have 108 beads, while some have 216 (double), or 54
(half).
Here are some more popular reasons behind the 108 mythology in mala beads.
Chakras
One
of our favourite explanations for having 108 beads on a mala is related
to the chakras (the seven energy points in our body).
It has
been said there there are 108 energy lines connecting to the heart, with
one of them believed to be the path to self realization.
Mantras
When
using your mala beads in meditation and chanting your mantra, some have
said you are complete once you have done it 100 times. The 8 extra
beads are to account for errors. Or even more beautiful, are meant to be
an offering to your guru.
Letters
Many
choose to recite their mantra in sanskrit, the ancient script of India.
Within the Saksrit alphabet there are 54 letters. Each letter has a
feminine and masculine version — totalling 108.
http://www.malacollective.com/blogs/mala-collective/9321123-how-to-cleanse-your-mala

Mala beads are believed to absorb and store energy, therefore
depending on your preference you may wish to cleanse your mala beads
from time to time.
We recommend that you do not lend or share your malas with others as
not to transfer any energy. If this does happen you may wish to cleanse
your mala.
How To Cleanse Your Mala
There are a few different ways you can cleanse your mala. Here are some of our favorite ways to cleanse ours:
- placing it in the sunlight or moonlight
- burning white sage
- by sound vibration such as a singing bowl or chanting
All of our malas are blessed in Bali and it is not necessary to cleanse before wearing.
Cleaning Your Mala
With regular use you may also wish to clean your mala from time to
time. You can do this by placing the mala in warm water. You can also
add a mild soap if you wish. Soak the beads for some time (some suggest
leaving in over night). Use a delicate brush to scrub the seeds. Leave
the beads to fully dry.
After cleaning you can also brush your mala with coconut oil, or
sandalwood oil. Oiling will make the beads strong and they won't dry
out.
If your mala is well loved you may also want to freshen up the
tassel. One way to do this is by wetting the tassel and gently combing
the strands.
If you have any other questions about cleansing or caring for your mala please email us at info@malacollective.com.

Congratulations! You're taking a giant step towards finding inner peace, grounding, and overall self love.
Mala beads can help you with so much in your life. Especially the above.
Mala
beads have been used in prayer and meditation for centuries. But are
also known to help one find a calmer mind, body, and spirit by simply
having them present. We believe they act as a reminder to be more
conscious about what you're seeking, how you're acting, and what you're
manifesting.
When looking to connect with your mala beads, there's a few things to keep in mind.
First
and foremost — there is no wrong or right way to choose your mala.
And
typically, we find that the mala chooses you. If you simply surrender
to the process, and allow your heart and gut to guide you, you will be
lead to the right set of beads.
We often tell people, whatever one you are drawn to, is the one
that is meant for you. It most often reflects the intentions you are
seeking.
However, if you are looking for more guidance in the process, here are a few suggestions.
Ask yourself, what intention are you seeking?
Our mala beads combine rudraksha seeds with gemstones. Rudraksha seeds embody a calmer mind, body, and spirit.
But
each gemstone carries its own intention.
If you are seeking
tranquility, and a closer connection to your spirituality, we would
suggest a mala with amethyst.
If you are seeking balance or abundance, we would suggest green jasper.
If strength and clarity is what you're looking for, lava is the best stone.
And
if love is something you are seeking — whether self, platonic, family,
or relationship — we encourage using rose quartz.
There are numerous
possibilities.
One of our favourites is turquoise, which protects on a journey, and increases love and destroys hatred.
You can also ask yourself — what will you use your mala beads for?
Will you use it for meditation? Or do you simply want a daily reminder to follow your intentions?
If
you are looking specifically for meditation, that's great! All of our
mala necklaces are hand knotted between each seed and stone. This helps
in the meditation process of counting your mantras.
We also include the guru bead in our necklaces, to signify that you have counted all 108 beads.
If
you are looking to use your mala as a daily reminder of something you
want to manifest in your life, or an intention you want to be mindful
of, that's a beautiful reason, too. You can do this with either
bracelets or necklaces. You can even combine different gemstones. We
find many people will layer numerous bracelets, combining lava, rose
quartz, and turquoise bracelets together.
Whatever your reason, enjoy the process!
You're in for a beautiful journey with your new mala beads.
Buying mala beads for someone else? Read more here.
This article was written by Mala Collective founder and journalist Ashley Wray.]
http://www.malacollective.com/blogs/mala-collective/9320873-how-do-i-choose-my-mala
A number of years ago a friend of mine went to a new yoga class.
At one point they did a Camel pose and my friend couldn’t quite reach
her heels. She was content keeping her hands on her back, until the yoga
teacher appeared beside her and began cheering “You are almost there –
reach, reach, reach!” My friend did reach her heels to the excited
clapping of the teacher and threw her back out. She was out of
commission for months.
At the risk of sounding like a broken record, I will say it again –
achieving the deepest form of the posture is NOT a goal in yoga. And
even though we do need to challenge ourselves physically and otherwise
to facilitate growth, we need to do so responsibly.
Many teachers seem to believe that the risks of a back bend are
minimized if the body is positioned properly in the posture. This is
certainly true, but this is not enough. Some other points that are
essential in making the back bends safer include:
- Building gradual progression of intensity (both in the space of one class and long-term)
- Limiting the number of back bends within one practice
- Using stabilizing postures
- Including adequate compensation
Let’s explore those.
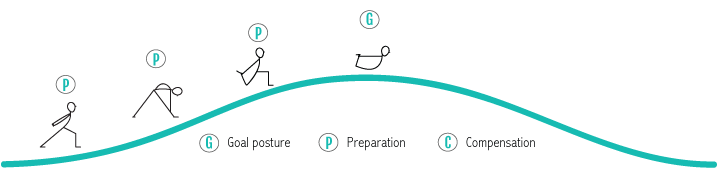
1. Gradual progression means building the intensity
gradually toward the peak, where the following posture is a bit more
challenging then the one before it. If you have a certain pose in mind
that you would like to work toward, you would need to analyze the pose
first on the level of skeletal structure, joint positions and muscle
actions to see which parts of the body require preparation. We usually
start from the spine, then move to the shoulder/pelvic girdle, then out
to the extremities. For example:
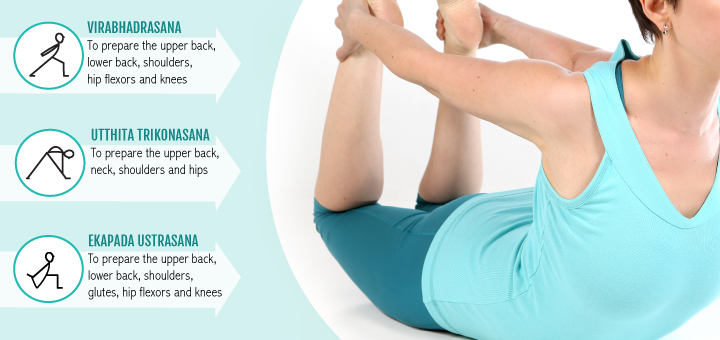
 Then we can select some Core poses that would help us get there, for example:

 Notice how the choice of the arm positions imitates the arm position
in the goal posture – this is also part of the preparation process. Of
course, we wouldn’t do those poses back-to-back; we would need to
compensate for them in the course of the practice.
2. Limiting the number of back bends. I’ve been to
yoga classes where the teacher seemed to include every back bend
possible. More is not better. For people who are already extra-bendy too
many back bends will only destabilize the structure, making it more
vulnerable. For those people who do not have a lot of spinal flexibility
it will be too much, since their bodies are not used to this sort of
movement – that’s an injury waiting to happen. Generally, I wouldn’t
recommend doing more then 4-5 back bends within a practice.
3. Stabilizing postures take care of the lower back
and sacrum. This is such an important role that back bends play, yet it
frequently goes overlooked. When we do all those fancy standing postures
– back bends, side bends, twists – we pull the spine and sacrum in
every direction while keeping the pelvis relatively stable. The
potential of torquing or destabilizing the SI joins
is high. So afterwards we need to stabilize the relationship between
the sacrum and pelvis by doing some sort of symmetrical prone back
bends; Vimanasana works great, as well as certain variations of
Bhujangasana.
Notice how the choice of the arm positions imitates the arm position
in the goal posture – this is also part of the preparation process. Of
course, we wouldn’t do those poses back-to-back; we would need to
compensate for them in the course of the practice.
2. Limiting the number of back bends. I’ve been to
yoga classes where the teacher seemed to include every back bend
possible. More is not better. For people who are already extra-bendy too
many back bends will only destabilize the structure, making it more
vulnerable. For those people who do not have a lot of spinal flexibility
it will be too much, since their bodies are not used to this sort of
movement – that’s an injury waiting to happen. Generally, I wouldn’t
recommend doing more then 4-5 back bends within a practice.
3. Stabilizing postures take care of the lower back
and sacrum. This is such an important role that back bends play, yet it
frequently goes overlooked. When we do all those fancy standing postures
– back bends, side bends, twists – we pull the spine and sacrum in
every direction while keeping the pelvis relatively stable. The
potential of torquing or destabilizing the SI joins
is high. So afterwards we need to stabilize the relationship between
the sacrum and pelvis by doing some sort of symmetrical prone back
bends; Vimanasana works great, as well as certain variations of
Bhujangasana.
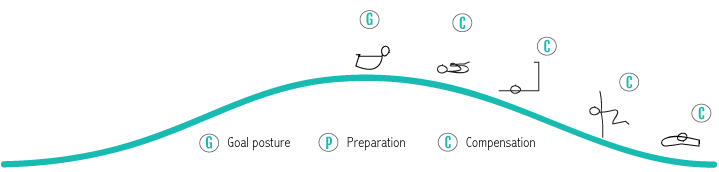
 4. Adequate compensation is essential in bringing
the body back to the state of balance. We don’t bend back very often in
our daily lives, so for many people this is a foreign and intense
movement that needs to be neutralized. Often several poses are necessary
to compensate for a deep back bend. In the example of Dhanurasana we
might need couple of forward bends to stretch the back, an axial
extension posture to mobilize the hips and shoulders, and a twist to
realign the shoulder and pelvic girdles.
4. Adequate compensation is essential in bringing
the body back to the state of balance. We don’t bend back very often in
our daily lives, so for many people this is a foreign and intense
movement that needs to be neutralized. Often several poses are necessary
to compensate for a deep back bend. In the example of Dhanurasana we
might need couple of forward bends to stretch the back, an axial
extension posture to mobilize the hips and shoulders, and a twist to
realign the shoulder and pelvic girdles.
 Back bends play two very different distinctive roles in any yoga
sequence: some increase the range of motion of the spine and others
stabilize the lower back and sacrum. That’s why it matters how we
distribute them throughout the yoga practice. To see those ideas in
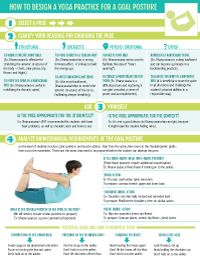
action, check out this step-by-step process of building a sequence for Dhanurasana.
Back bends play two very different distinctive roles in any yoga
sequence: some increase the range of motion of the spine and others
stabilize the lower back and sacrum. That’s why it matters how we
distribute them throughout the yoga practice. To see those ideas in
action, check out this step-by-step process of building a sequence for Dhanurasana.

 http://sequencewiz.org/2015/05/20/how-to-organize-back-bends-in-a-yoga-sequence/
 Worrying has
become a national pastime. Whether you're worrying about repaying your
college loan, having job stability in an unstable economy or making sure
your toddler hits all the developmental milestones at the right times,
there's no shortage of material for mind sweat.
According to The Anxiety And Depression Association Of America,
anxiety disorders are the most common mental diagnosis in the United
States. They cost the country $42 billion a year, and go hand-in-hand
with depression. People with an anxiety disorder are also three to five
times more likely to go to the doctor and six times more likely to be
hospitalized for a psychiatric illness.
Especially for those of
us interested in wellness, it can almost feel tiring to be told the
importance of "letting go," "relaxing" and "unwinding." While this
advice is ultimately right, there's also good reason we might feel
inclined to resist it. The simple reason? Biology: all of our brains are
wired to worry.
Basically, the same brain circuits that make for
super human intelligence in our frontal lobes (allowing decision
making, problem solving, and planning) also produce worry. For your
brain, the only difference between worrying and planning is the amount
of emotional involvement and self-oriented processing in a specific part
of the brain. Of course, we all know worrying is charged with more
negative emotions.
But your brain's number one priority is keeping you alive, and it's evolved to do that very well. Sometimes, worrying is the body's response to danger, an evolutionary mechanism to keep you alive.
But
you can take concrete steps to climb out of the worry trap. You have to
learn to soothe and guide your thinking brain and calm it's fear
circuit. Here are some ways to begin:
1. Cultivate greater awareness about your emotions.
The first step to decreasing worry is to recognize when
you're doing it. Becoming aware of your emotional state as it occurs
enlists your thinking frontal cortex and suppresses the fight or flight
amygdala response. In the study Putting Feelings Into Words, when participants simply labeled an emotion, their brains calmed down.
2. Take a deep breath (ideally many of them).
Taking
slow, deep breaths through your nose into your diaphragm with slow
exhales turns down your nervous system and reduces your body's stress
response. This advice is undoubtedly not the most original, but that
doesn't mean it's not effective. Think of it this way: if your breathing
and heart rate naturally speed up when you are under stress, you can
choose to reverse your response — by breathing slowly. This will send
your body the message "I am relaxed," and you will become more relaxed
as a result. It's like magic, with science.
3. Don't look back or forward.
When
you find your mind drifting into the past or future, come back to the
present moment, right here right now — a practice known as mindfulness.
In this moment, you are OK. Your thoughts are creating your sense of
danger. Bringing your awareness back into the now calms the fearful
amygdala in your brain and activates your thinking neural circuits. Studies show that with repetition, mindfulness practice can lead to long term, lasting reduction of anxiety and worrying.
4. Pay attention only to what you can control.
Your
brain craves control and feels happier and calmer when it just feels
more in control — even if it's just an illusion. Feeling in control can
reduce anxiety, worrying, and even pain. So, avoid imagining the worst
possible scenarios, and instead pay more attention to what is in your
control, which modulates brain activity to reduce anxiety.
5. Make a decision, even if you don't really want to.
Simply
making a decision about whatever it is that you're worrying invokes
your thinking brain, increases dopamine levels, and shifts your brain's
perceptual focus on the things that matter the most. Making a decision —
any decision — also elevates your perceived control giving your
confidence and mood a boost which helps you to take positive action.
6. Go for good enough.
Worrying is often triggered by imposing unrealistic or perfectionist expectations
on yourself or others. Don't aim for being the perfect parent; just be a
good one. Your kid doesn't have to get into an Ivy League college. They
just need to go to college. You don't have to be model thin. You just
want to be healthy.
The problem with worry arises when the brain
anxiety-circuits activate too frequently and get stuck in the "on"
position continually which triggers the body's fear response. This then activates the stress response
— which starts a downward spiral ... making you a miserable mess. So
rather than make yourself more stressed out by worrying-about-worrying,
think of worry as your brain just doing its job. You just don't want it
to get too enthusiastic.
Photo Credit: Stocksy
Worrying has
become a national pastime. Whether you're worrying about repaying your
college loan, having job stability in an unstable economy or making sure
your toddler hits all the developmental milestones at the right times,
there's no shortage of material for mind sweat.
According to The Anxiety And Depression Association Of America,
anxiety disorders are the most common mental diagnosis in the United
States. They cost the country $42 billion a year, and go hand-in-hand
with depression. People with an anxiety disorder are also three to five
times more likely to go to the doctor and six times more likely to be
hospitalized for a psychiatric illness.
Especially for those of
us interested in wellness, it can almost feel tiring to be told the
importance of "letting go," "relaxing" and "unwinding." While this
advice is ultimately right, there's also good reason we might feel
inclined to resist it. The simple reason? Biology: all of our brains are
wired to worry.
Basically, the same brain circuits that make for
super human intelligence in our frontal lobes (allowing decision
making, problem solving, and planning) also produce worry. For your
brain, the only difference between worrying and planning is the amount
of emotional involvement and self-oriented processing in a specific part
of the brain. Of course, we all know worrying is charged with more
negative emotions.
But your brain's number one priority is keeping you alive, and it's evolved to do that very well. Sometimes, worrying is the body's response to danger, an evolutionary mechanism to keep you alive.
But
you can take concrete steps to climb out of the worry trap. You have to
learn to soothe and guide your thinking brain and calm it's fear
circuit. Here are some ways to begin:
1. Cultivate greater awareness about your emotions.
The first step to decreasing worry is to recognize when
you're doing it. Becoming aware of your emotional state as it occurs
enlists your thinking frontal cortex and suppresses the fight or flight
amygdala response. In the study Putting Feelings Into Words, when participants simply labeled an emotion, their brains calmed down.
2. Take a deep breath (ideally many of them).
Taking
slow, deep breaths through your nose into your diaphragm with slow
exhales turns down your nervous system and reduces your body's stress
response. This advice is undoubtedly not the most original, but that
doesn't mean it's not effective. Think of it this way: if your breathing
and heart rate naturally speed up when you are under stress, you can
choose to reverse your response — by breathing slowly. This will send
your body the message "I am relaxed," and you will become more relaxed
as a result. It's like magic, with science.
3. Don't look back or forward.
When
you find your mind drifting into the past or future, come back to the
present moment, right here right now — a practice known as mindfulness.
In this moment, you are OK. Your thoughts are creating your sense of
danger. Bringing your awareness back into the now calms the fearful
amygdala in your brain and activates your thinking neural circuits. Studies show that with repetition, mindfulness practice can lead to long term, lasting reduction of anxiety and worrying.
4. Pay attention only to what you can control.
Your
brain craves control and feels happier and calmer when it just feels
more in control — even if it's just an illusion. Feeling in control can
reduce anxiety, worrying, and even pain. So, avoid imagining the worst
possible scenarios, and instead pay more attention to what is in your
control, which modulates brain activity to reduce anxiety.
5. Make a decision, even if you don't really want to.
Simply
making a decision about whatever it is that you're worrying invokes
your thinking brain, increases dopamine levels, and shifts your brain's
perceptual focus on the things that matter the most. Making a decision —
any decision — also elevates your perceived control giving your
confidence and mood a boost which helps you to take positive action.
6. Go for good enough.
Worrying is often triggered by imposing unrealistic or perfectionist expectations
on yourself or others. Don't aim for being the perfect parent; just be a
good one. Your kid doesn't have to get into an Ivy League college. They
just need to go to college. You don't have to be model thin. You just
want to be healthy.
The problem with worry arises when the brain
anxiety-circuits activate too frequently and get stuck in the "on"
position continually which triggers the body's fear response. This then activates the stress response
— which starts a downward spiral ... making you a miserable mess. So
rather than make yourself more stressed out by worrying-about-worrying,
think of worry as your brain just doing its job. You just don't want it
to get too enthusiastic.
Photo Credit: Stocksy

At best an IBS episode can be uncomfortable;
at worst it’s debilitating and embarrassing. Thankfully, yoga offers
some simple solutions.
BY Kelly McGonigal
When something doesn’t feel right in your gut, it’s usually a sign that
something isn’t right in your life. Gut feelings can be a message from
txhe brain as much as from the belly. If you are one of the many people
who suffer from irritable bowel syndrome (IBS), this message manifests
as more than an occasional discomfort. It is a chronic experience of
abdominal pain and digestive distress that reflects the intimate link
between the mind and the body. But take heart—yoga can relieve your
symptoms by reducing stress and teaching you how to listen to your body.
Understanding IBS
IBS is one of the most common health conditions, affecting as many as 45 million people in the United States.
IBS has the unusual distinction of being both one of the most common
health conditions—affecting as many as 45 million people in the United
States—and the condition you’re least likely to talk about. Who wants to
describe the cycles of bloating, gas, constipation, and diarrhea? Or
admit to feeling at the mercy of an unpredictable and uncooperative
digestive tract? IBS has also long been a bit of a medical mystery. The
symptoms suggest a problem in the digestive tract, but people with IBS
show no physical damage to their stomach, intestines, or colon.
Instead, the problem seems to lie in how the nervous system
communicates with the digestive tract. Your brain and gut are
intricately linked—you might even say that the gut is where the mind and
the body meet. Your digestive tract contains hundreds of millions of
nerve cells that receive a constant barrage of signals about the state
of your body, thoughts, and emotions. This makes your gut highly
responsive to changes in your well-being, both physical and emotional.
The problem of IBS seems to lie in how the nervous system communicates with the digestive tract.
Some experts believe IBS is caused by a disruption of normal brain–gut
interactions. For people with IBS, the nerves of the digestive system
become oversensitive. The digestive tract overreacts to food, stress,
and other demands on your body and mind. Along with these digestive
symptoms, people with IBS tend to suffer from high levels of anxiety. It
is currently unknown whether the chronic digestive problems create
chronic anxiety, or whether heightened levels of stress and worry
trigger heightened gut sensitivity. But findings linking the gut and the
brain help chart a clearer path to healing. To gain freedom from IBS,
you need to reduce stress, get comfortable with discomfort, discover
your symptom triggers, and restore normal function of the digestive
tract.
Yoga can be an important part of each step. Two clinical studies—one by
researchers at the All India Institute of Medical Sciences in New Delhi
in 2004, and the other by researchers at the University of British
Columbia in 2006—have shown that daily practice of basic yoga postures
with mindful breathing can reduce both the emotional and the physical
symptoms of IBS. You can create your own healing yoga practice by
following a few simple guidelines and trying the following sequence of
postures.
How Yoga Can Help IBS
Stress is one of the most common triggers of IBS symptoms. Yoga can
help you shut down stress by calming the nervous system—and, in the
process, calm your irritated digestive system. For the best results,
choose postures that are accessible, not overly ambitious. You don’t
want to struggle to squeeze your body into postures that are more
painful than peaceful. Make steady, smooth breathing the focus of your
practice; if your breathing is strained, it will reinforce your stress
and symptoms. Finally, be sure to include a relaxation pose at the end
of your practice, and even consider starting your practice with
relaxation. This can send a clear signal to your body and mind that it
is time to slow down, let go, and shift toward a healing state.
Yoga can also help you tolerate uncomfortable sensations. If you have
IBS, you have probably learned to recognize the first signs of an
episode. You may be vigilant for any change in sensation in your belly
and gut—the pressure of bloating or the first twinge of cramping that
warns you things might quickly get worse. Unfortunately, anxiety about
gut feelings can actually intensify your symptoms. But if you breathe
and stay with the sensation, your body learns to relax, even with
intense feelings. You can learn to be with your symptoms in the same
accepting mindful way that you stay with the sensations of a yoga pose.
This can profoundly change your experience of the pain and keep a mild
episode from becoming severe.
Yoga can relieve your IBS symptoms by reducing stress and teaching you how to listen to your body.
Yoga can even help you prevent episodes altogether by making you aware
of what makes your symptoms worse. From specific foods to caffeine,
alcohol, or sleep deprivation, every IBS sufferer has triggers they can
learn to avoid. Yoga is a perfect training ground for cultivating a
heightened awareness of cause and effect in your body that carries over
to choices off the yoga mat. With time, you will find yourself having
stronger insights into what is healing, and what is harmful, to your
body. You will find yourself wanting to do what is good for your body,
and less attracted to what makes your symptoms worse.
A well-sequenced yoga practice
will send gentle pulses of compression and stretch to sensory receptors
along the digestive tract, soothing your IBS.
Finally, yoga may help restore normal motility of the gut. When you
have IBS, the contractions of your intestines may be slowed to the point
of constipation or spasming to the point of diarrhea. Some yoga poses,
like seated twists or prone backbends, put gentle pressure on the
abdominal organs. Others, like side bends and reclining twists, release
tension around the abdomen. A well-sequenced yoga practice will send
gentle pulses of compression and stretch to sensory receptors along the
digestive tract. This combination of pressure and release is believed to
help balance the contractions of the gut, whether getting things moving
or slowing things down.
The Sequence
The following sequence will help reduce stress, release tension in the
abdomen, and support general digestive health. It can ease discomfort
during your milder symptoms and help prevent future episodes.
You can practice this sequence on its own or following a series of
warm-ups and standing poses. As you hold each posture, stay with the
sensations of your body and breath. Use the least amount of effort
needed to hold the postures with integrity. Remind yourself in each pose
to release any unnecessary tension throughout the body.
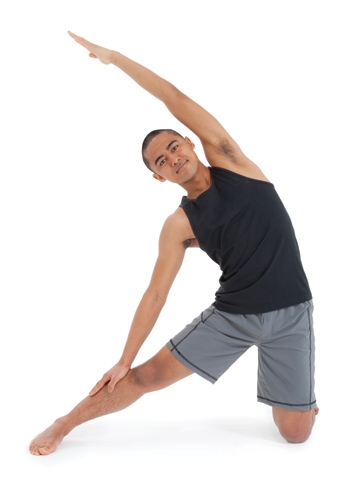
Parighasana (gate pose)
From tall kneeling, stretch your right leg out to the right, heel on
the ground, foot flat, toes reaching to the floor. Inhale and lift your
left arm up; exhale and lean your torso over the right leg. Rest your
right hand on a block, the floor, or your shin. Reach through the left
arm and hand with clear intention, noticing how this gesture increases
the stretch in the left side of your body. Feel the breath in the left
rib cage, waist, and belly. Choose a position for the head and neck that
feels least strained, and remember to relax your face, softening your
forehead, eyes, mouth, and jaw.
Stay in the pose for 5 to 10 breaths, then repeat on the other side.
After practicing this posture on both sides, return to kneeling. Place
your hands on your side ribs, and feel the movement of the breath under
your hands. Inhale and exhale patiently and fully, letting your rib cage
expand and contract.
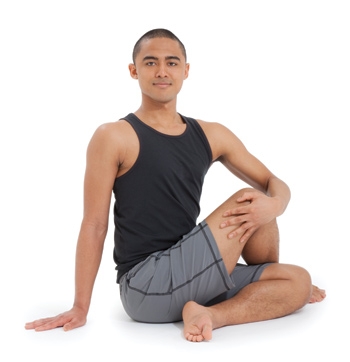
Ardha matsyendrasana (half-seated spinal twist)
Come into a seated position, extend your left leg and cross your right
leg on top, planting the foot flat on the ground next to your left knee.
Then bend your left knee and bring the left foot to the outside of the
right hip. Sit evenly on both hips and lengthen up through your spine.
Slowly turn your torso toward the right leg. You can hug the right knee
with your left arm, or bring the left elbow across the right thigh and
press the outer thigh into the upper arm. As you exhale, slowly draw
your navel toward your spine to help press the breath out smoothly. You
may find that you can twist a bit more with each exhalation, but do not
force or strain.
If this twist feels too compressive, try twisting in the opposite
direction—to your left, away from the top leg. This version of the pose
gives a little more space for the abdomen to relax and for the belly to
breathe.
Hold for 5 to 10 breaths, then switch sides.
Jathara parivritti (reclining abdominal twist)
Lie down on your back with both legs straight. As you exhale, bend your
right leg and hug it in to your belly. Pause here for a couple of
breaths. Then take the right leg across your body, rolling to your outer
left thigh and hip. Reach your right arm back, extending straight out
from the shoulder, palm up. Let your right shoulder blade come off the
ground, so that the spiral of the posture moves all the way from your
legs through your pelvis, spine, ribs, and chest. If the pose feels too
intense, consider placing a blanket or other support underneath the
right knee and/or right arm. As you rest in the pose, feel the breath
stretching the lower belly, side waist, and chest from the inside out.
Hold for 5 to 10 breaths, then return to lying on your back. Repeat on your left side.
Salamba setu bandhasana (supported bridge pose)
Place a bolster, a stack of firm blankets, or a block underneath your
hips and lie on your back. Make sure the support is under your sacrum
and pelvis, not your lower back or ribs. Slide your legs out straight,
and relax your arms by your side, palms up. If you have a strap, loop it
around the mid-thighs to support your legs in place. The strap should
be tight enough for you to completely relax the effort in your legs, but
not so tight that the legs are squeezed together. If you don’t have a
strap, you can place the soles of your feet against a wall to provide
more support for your legs.
Stay in this posture for at least 10 breaths, and up to five minutes.
As you hold the posture, bring your awareness to your belly. Imagine
that you are inhaling and exhaling through your navel, the breath moving
into and through any tension in your abdominal organs. Sense the
tension dissolving with each breath. When you come out of the posture,
rest for 5 to 10 breaths lying on your back, hands on your belly.
If this posture is not comfortable, or you do not have props available, consider another gentle inversion, viparita karani (legs-up-the-wall pose).
Ananda balasana (happy baby pose)
Lie on your back, hug your knees into your chest, and take a breath or
two, feeling your back relax into the support of the ground. Then let
your knees drop wide apart, and reach the soles of your feet toward the
ceiling. Keep your legs bent, with your feet directly over your knees.
Hold on to the big toes or the sides of your feet. Relax into the pose,
without trying to pull yourself deeper into it. Let the arms be
straight, shoulder blades dropping to the ground. Relax the weight of
your hips, lower back, and ribs, and feel the stretch in your groin and
hips. Let the movement of your breath and belly fill the open space
between your legs. Stay here for 10 breaths.
If this posture is too intense a stretch for your hips, practice supta baddha konasana (reclining bound angle pose) instead.
After you complete this sequence, rest in shavasana (corpse
pose). Practice slow abdominal breathing, allowing the belly to rise and
expand as you breathe in, and sink as you breathe out. Place your hands
on your lower belly. Let this gesture be a comfort, reminding you of
your deep desire to take care of yourself. If you have any discomfort in
your abdomen, imagine the breath moving into and through the pain. Let
the breath lead you into a state of deep rest and healing.